
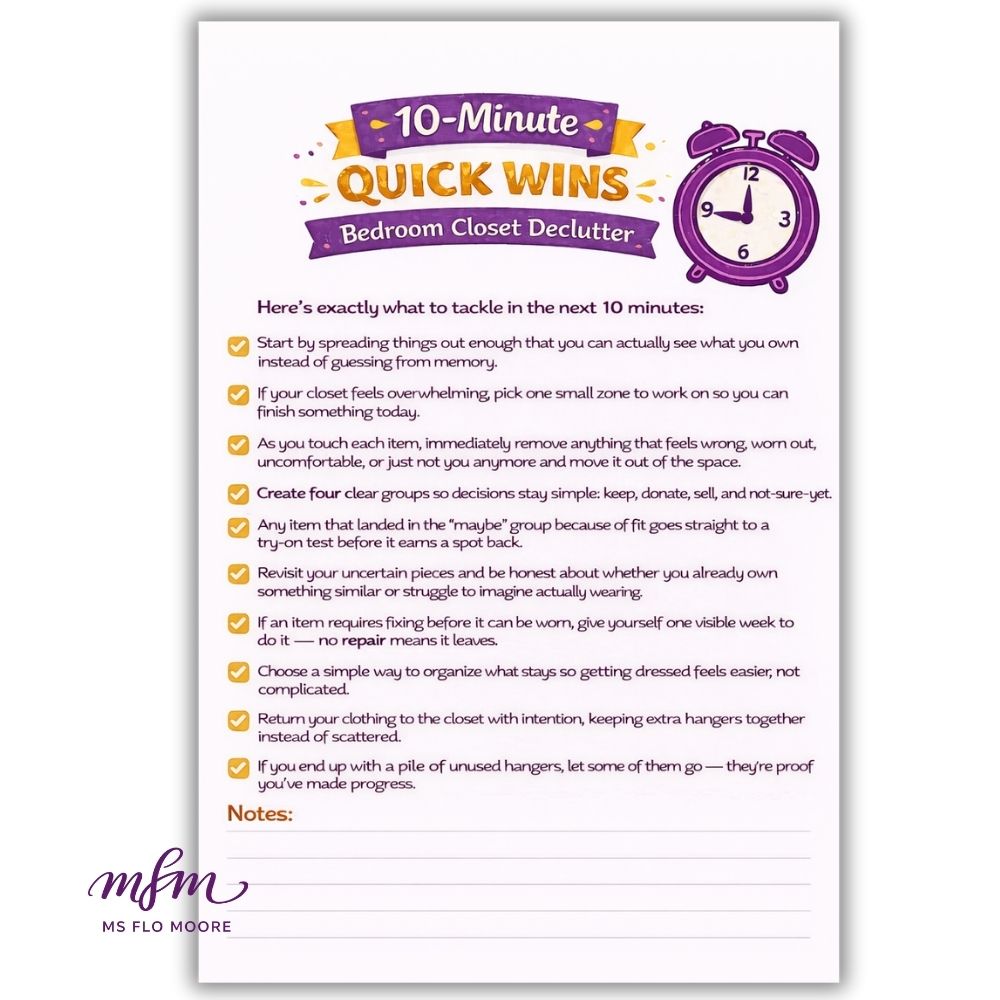
10-Minute Closet Declutter

I love a clean closet — but living real life means I don’t always have hours to declutter and organize. Most days, I’m working with small pockets of time, and honestly? That’s more than enough when you have a clear plan.
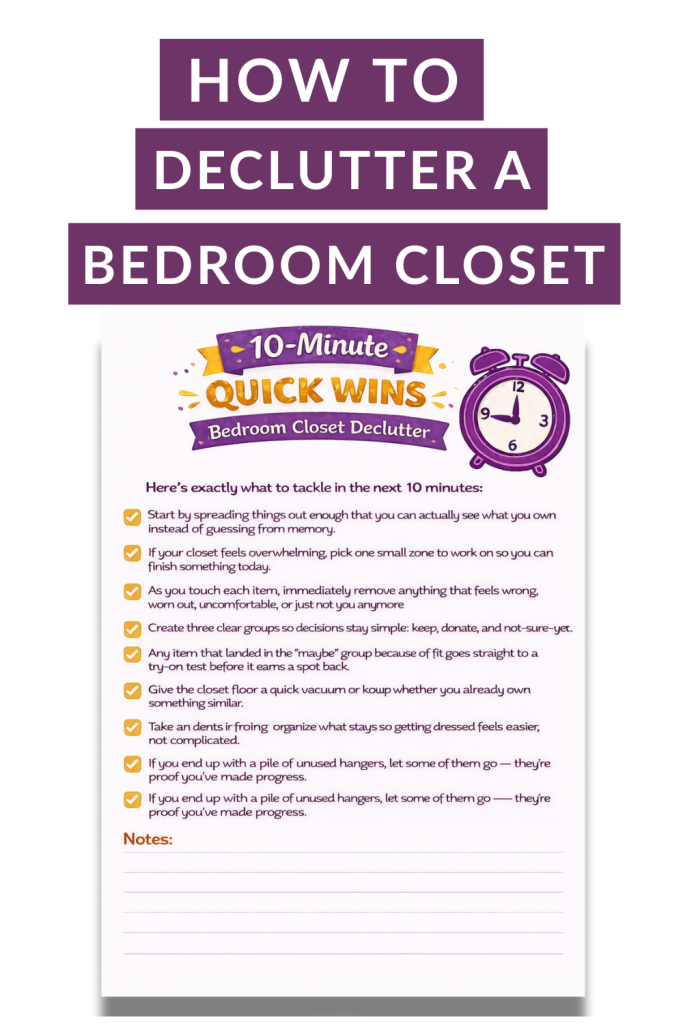
So today, I’m switching gears from big decluttering overhauls to something much more doable — a 10-Minute Quick Win. This week’s focus is your bedroom closet, and we’re using a simple checklist to make fast, meaningful progress without overwhelm.
This quick win is designed to help you see what you own, let go of what no longer fits your life, and make getting dressed feel easier — all in just ten minutes.
Want to save this checklist? Enter your email below and we’ll send the checklist straight to your inbox.
Fields marked with an * are required

This checklist was created to remove decision fatigue and keep you moving forward. Instead of asking you to declutter your entire closet, it walks you through one small zone at a time — with clear decisions, simple categories, and built-in stopping points.
Every step is intentional. You’re not guessing what to do next, wondering how much time you’ll need, or trying to make perfect decisions. You’re simply following the checklist and letting progress happen naturally.
I’m sharing this Bedroom Closet Declutter checklist with you completely free, along with a photo walkthrough (for those who love to read) and a watch-me-declutter video (for those who prefer to watch – inside my Facebook group). You’ll find the printable PDF checklist for decluttering your bedroom closet right here on my blog.
So enough talking — let’s declutter a closet already, shall we? This post may contain affiliate links for your convenience (which means if you make a purchase after clicking a link, I may earn a small commission at no extra cost to you). You can read my full disclosure policy here.
Materials to declutter your bedroom closet
- 1 small trash bag, or large trash bag (for anything that’s ready to go)
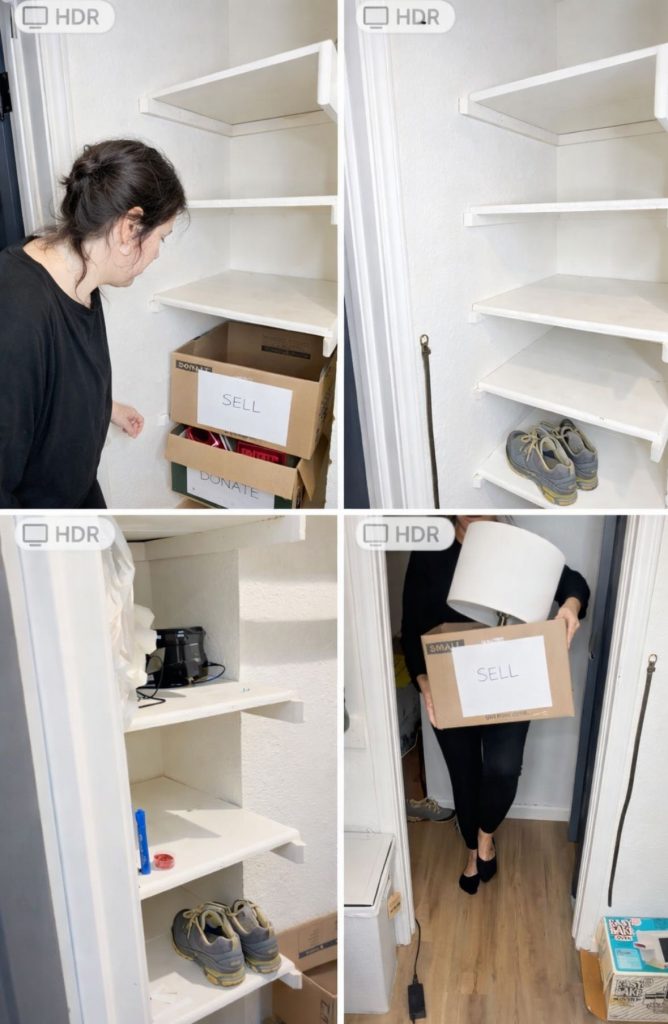
- 3 collapsible cube storage bins (I like using fabric collapsible bins — one for donate, one for sell, and one for not-sure-yet)
- To clean the space after, use a microfiber cloth
- Checklist #1 — My free Bedroom Closet Declutter PDF checklist (available in my free resource library—get the password by filling out the form at the bottom of this page)
How to declutter bedroom closet
Step 1: Get the Free checklist to declutter bedroom closet
Get Checklist #1 which is the bedroom closet declutter from my free resource library (get the password to the library in the form at the bottom of this post).
Step 2: set a 10 minute timer
Set a timer for 10 minutes. This checklist is designed to help you make progress quickly, so give yourself permission to stop when the timer goes off.
You can always come back for another quick win later.
Step 3: Choose One Small Zone
If your closet feels overwhelming, choose one small area to focus on — a section of hanging clothes, a shelf, or a drawer. Finishing one zone today is better than starting too much at once.
Step 4: Spread Items Out So You Can See What You Own
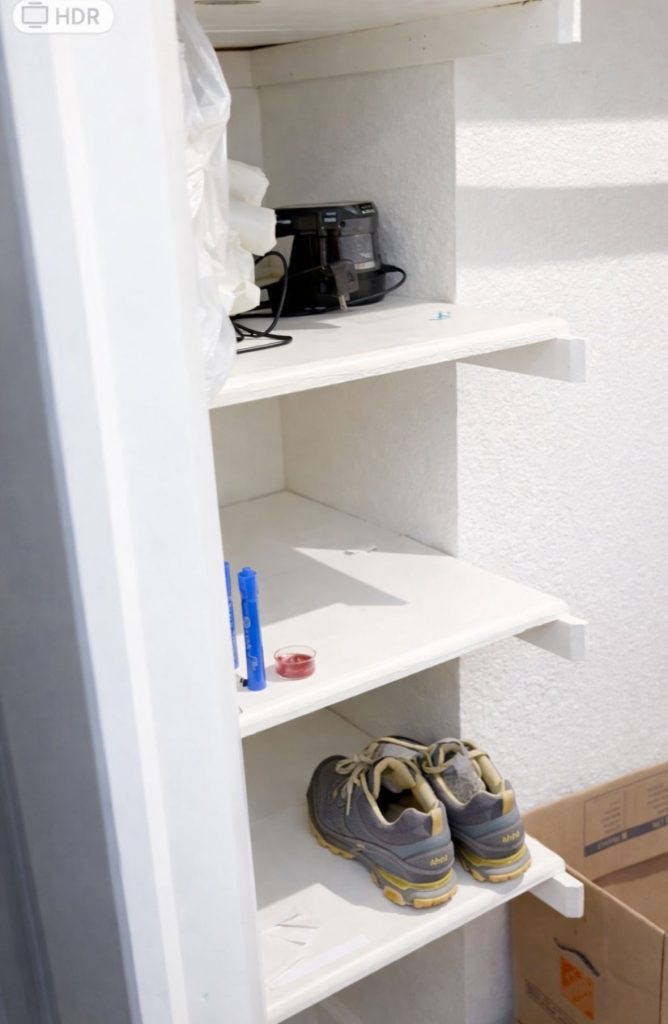
Spread items out enough that you can actually see what you own instead of guessing from memory.
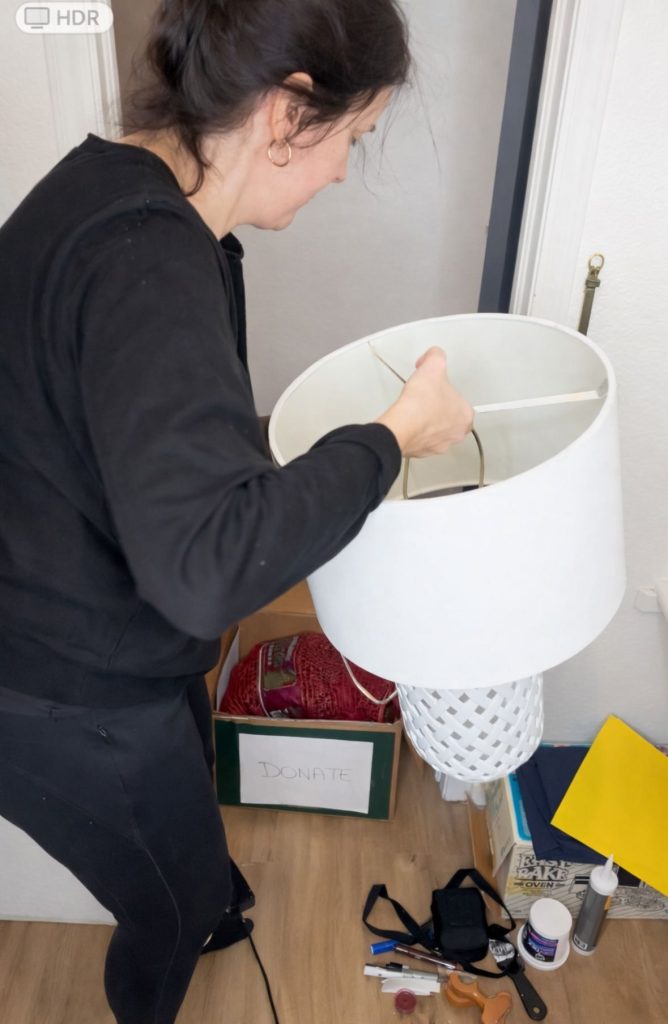
If you’re working on a shelf or top shelf, take everything off and place it on the floor or bed. If you’re decluttering a hanging section, slide items together or pull them out so nothing stays hidden.

It might look a little messy for a moment — that’s normal! Seeing everything clearly makes decisions easier and faster.
Step 5: Remove Anything That Feels Wrong
As you touch each item, immediately remove anything that feels worn out, uncomfortable, or just not you anymore. If you hesitate or feel unsure the moment you pick something up, that’s a sign. Move it out of the closet right away so it doesn’t sneak back in. Trust your instincts — they’re usually right.
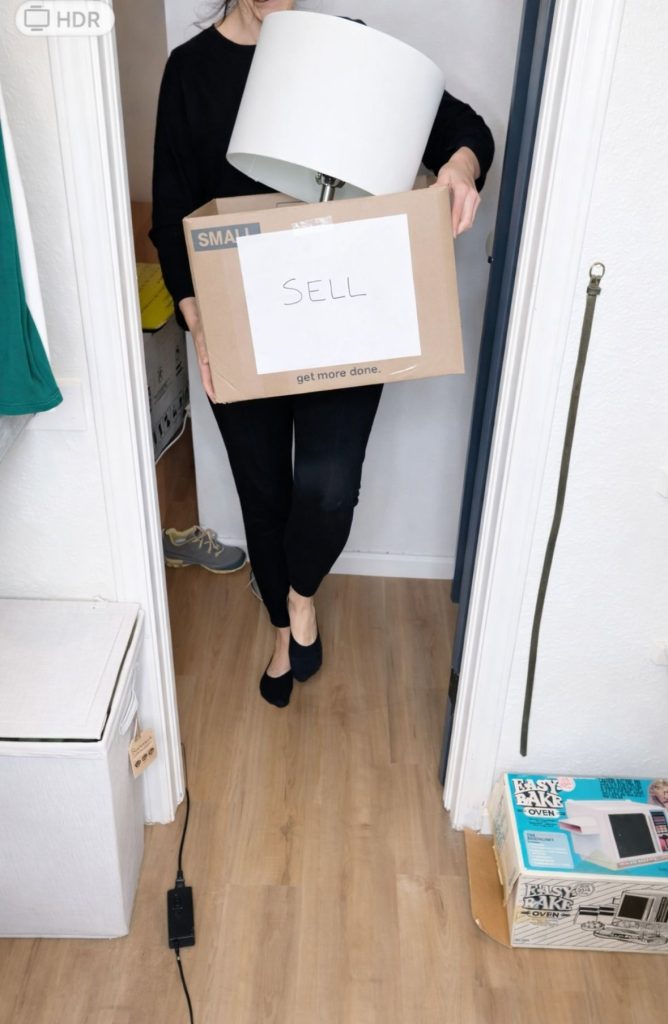
Step 6: Sort Into Four Clear Groups
reate four clear groups to keep decisions simple and moving forward:
- Keep
- Donate
- Sell
- Not-sure-yet
Don’t overthink this step. Go with your first instinct and keep placing items where they belong. You can always revisit the “not-sure-yet” group in the next step.
Step 7: Try On “Not-Sure-Yet” Items
Any item that landed in the not-sure-yet group because of fit goes straight to a try-on test before it earns a spot back in your closet.
Try it on now, while everything is already out. This keeps the decision simple and prevents those pieces from quietly returning without being worn.
Step 8: Be Honest About What You’ll Actually Wear or use
If an item needs fixing before it can be worn, give yourself one visible week to take care of it. Place it somewhere you’ll see it so it doesn’t get forgotten. If it isn’t repaired by the end of the week, it’s time to let it go.
Step 9: Set a One-Week Rule for Repairs or Use
If an item needs fixing or intentional use before it can earn a place in your closet, give yourself one visible week to follow through. Place it somewhere you’ll see it so it doesn’t get forgotten. If it isn’t repaired or used by the end of the week, it’s time to let it go.
Step 10: Choose a Simple Way to Organize What Stays
Decide how you want to organize the items you’re keeping so getting dressed feels easier, not more complicated. Group like items together or arrange them in a way that makes sense to you. Simple systems are easier to maintain and work better long-term.
Step 11: Return Clothing or items Intention
Place your clothing back into the closet with intention, rather than rushing to put everything back.
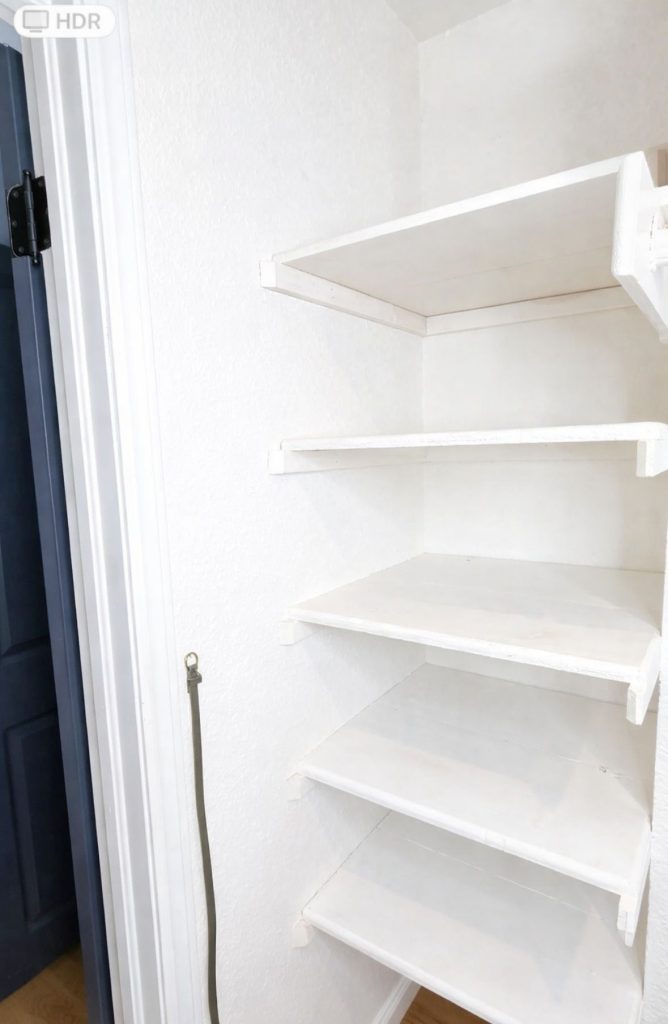
You may notice that there’s nothing to add back — many closets end up being used as storage for items that don’t belong there. If that’s the case, enjoy the open space you’ve created. An empty shelf or rod isn’t a problem — it’s progress.
Keep extra hangers together instead of scattered throughout the space to maintain that calm, open feel.
Voilà! You now have a calm, open, and more functional bedroom closet — created in just 10 minutes.
Enjoy the extra space, easier mornings, and the feeling of knowing everything in your closet actually belongs there. Use the open shelves intentionally, keep them empty if that feels best, or simply enjoy the breathing room you’ve created.
That’s the power of a quick win ✨
Free file for decluttering bedroom
Get the password for the library with the free file by filling out this form:
I love seeing how you declutter your bedroom closets using my checklist and tips! Please share a photo of your progress in our Facebook group or tag me on social media with #msflomoore.
Love

Want to remember this? Save this declutter your bedroom tutorial to your favorite Pinterest board.


![30 Day Declutter Challenge To Stay Organized [FREE Printable To Stay Organized]](https://msflomoore.com/wp-content/uploads/2025/11/30-day-declutter-challenge-768x768.jpg)
![Earn Money From Home Decluttering [FREE PDF]](https://msflomoore.com/wp-content/uploads/2025/11/temp-44.jpg)